As an Amazon Associate, we earn from qualifying purchases. Some links on this site are affiliate links at no extra cost to you. Our recommendations are based on thorough research and editorial judgment.

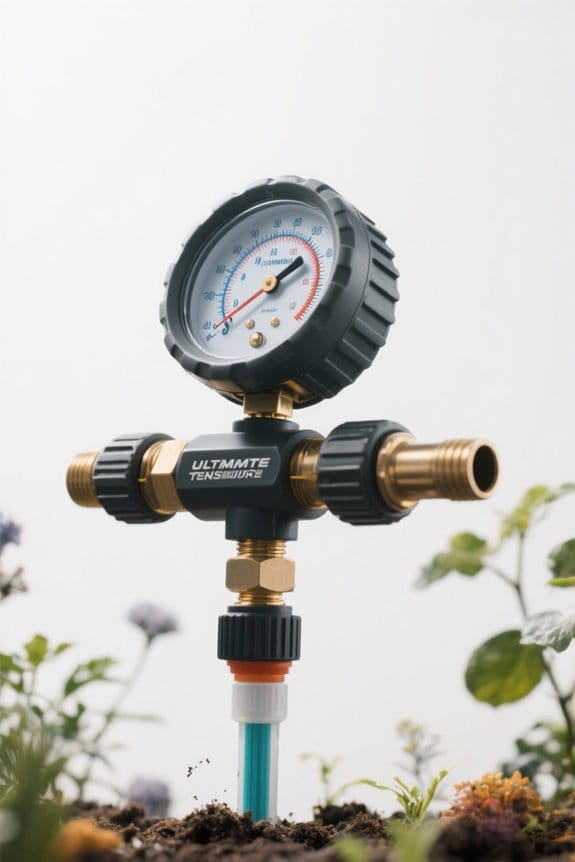
The Ultimate Tensiometer for Irrigation: Our Top Pick Revealed
For effective irrigation management, the Hunter HC100FLOW Irrigation Flow Meter is your top pick. It provides real-time water usage data, which helps reduce waste and lower bills. The built-in leak detection alerts you to abnormal flow, ensuring timely repairs. Made of durable, corrosion-resistant brass, it’s suitable for underground installation. Plus, it fits standard 1 NPT systems, making it ideal for new projects or retrofits. You’ll find more essential features that suit your irrigation needs as you continue.
Key Takeaways
- Choose a tensiometer that matches your soil type for effective moisture monitoring, with sandy soils needing more frequent checks than clay.
- Regular calibration is essential for accuracy; aim for a device that offers precision of ±0.1 bar.
- Durability matters; select stainless steel or brass models for resistance to harsh environmental conditions.
- Consider your budget; effective tensiometers generally range from $50 to $500, with potential long-term savings on water bills.
- Multi-depth installations benefit various plant root zones, enhancing overall irrigation effectiveness.
Hunter HC100FLOW Irrigation Flow Meter
Sale


Hunter HC100FLOW Irrigation Flow Meter, 1 in. for Hydrawise Controllers
- KNOW EXACTLY HOW MUCH WATER YOU’RE USING: Stop wasting water and money. This smart 1" flow meter delivers real-time usage data through your Hunter controller, helping...
- GET INSTANT ALERTS FOR LEAKS AND FAILURES: Broken pipe? Stuck valve? The HC100FLOW detects abnormal high or low flow and alerts you immediately—so you can fix problems...
- SEAMLESS INTEGRATION WITH HUNTER CONTROLLERS: No rewiring or adaptors needed. Just connect to your HC, Pro-HC, HPC, or HCC controller and unlock full Hydrawise flow...
The Hunter HC100FLOW Irrigation Flow Meter is an excellent choice for homeowners looking to efficiently manage their sprinkler systems. This 1″ smart water meter interfaces seamlessly with Hunter HC, Pro-HC, HPC, and HCC controllers. It provides real-time data on water usage, helping you reduce waste and lower utility bills. With built-in leak detection, it alerts you to any abnormal flow, ensuring timely repairs. Designed for durability, the meter features a solid brass body, making it corrosion-resistant and suitable for underground installation. Its compatibility with standard 1 NPT systems makes it ideal for both new installations and retrofits in gardens or landscapes.
Best For: Homeowners and landscapers looking to efficiently monitor and manage irrigation systems.
Pros:
- Real-time water usage data helps in reducing waste and lowering utility bills.
- Built-in leak detection alerts users to potential issues for timely repairs.
- Durable construction with a solid brass body ensures resistance to corrosion and harsh weather.
Cons:
- Compatibility limited to specific Hunter controller models.
- Requires installation, which may be challenging for DIY novices.
- Initial cost may be higher compared to basic flow meters.
Factors to Consider When Choosing Tensiometer Irrigation
When choosing a tensiometer for irrigation, consider factors like soil type, calibration accuracy, and installation requirements. You’ll want to guarantee your device can withstand the materials it encounters, such as clay or sandy soils, and meet your monitoring depth needs. Prioritizing these aspects will help you select a tool that effectively manages your irrigation system’s efficiency.
Soil Type Considerations
Choosing the right tensiometer for irrigation depends greatly on the soil type present in your area. Sandy soils drain quickly, requiring you to monitor moisture levels more frequently, often every few days. In contrast, clay soils retain moisture longer, allowing for less frequent checks. If you have loamy soil, you’ll benefit from a balanced structure, as this type usually provides ideal conditions for accurate readings. Additionally, consider soil compaction; denser soils restrict water movement, which can alter tension measurements. Organic matter in the soil enhances both moisture retention and aeration, further influencing accuracy. Finally, understanding your soil’s pH and salinity levels is essential, as these factors impact plant health and the tensiometer’s overall effectiveness.
Calibration and Accuracy
Accurate measurements are paramount for effective irrigation practices, especially following your exploration of soil types. Calibration is vital for ensuring that your tensiometer delivers accurate soil moisture readings; these can fluctuate due to temperature and soil type variations. Regularly calibrating against established moisture standards helps maintain accuracy and enhances irrigation efficiency. For finer soils, you should plan for more frequent recalibration compared to coarser ones. A well-calibrated tensiometer typically has an accuracy range of ±0.1 bar, allowing for precise moisture monitoring. Be aware that environmental factors, like salinity and soil compaction, can affect your tensiometer’s performance; accordingly, routine checks are essential for maintaining accurate readings throughout the growing season.
Installation Requirements
Guaranteeing effective installation is essential for the performance of your tensiometer in irrigation. First, select a site with good soil contact, as this allows accurate moisture tension measurements. Verify the tensiometer’s compatibility with your irrigation system, keeping water lines’ location in mind to prevent interference. Install the device at a depth of 12 to 18 inches, corresponding to the root zone of your plants. Additionally, guarantee the access point is easily reachable for regular maintenance and monitoring; a height of 36 inches is ideal. Finally, confirm that your installation complies with local regulations or guidelines related to agricultural practices, guaranteeing safe operation and long-term effectiveness for your irrigation efforts.
Material Durability
When evaluating material durability for a tensiometer in irrigation, consider key factors that affect longevity and performance. Look for corrosion-resistant materials to endure soil moisture and fertilizers; stainless steel or brass are strong options. These materials perform well under fluctuating temperatures and extreme conditions. Additionally, verify the tensiometer has UV-resistant components, which can prevent deformation in harsh sunlight. It’s crucial to assess the seals and joints; high-quality seals made of elastomers help avoid leaks, maintaining accurate moisture readings. Lightweight yet durable plastics or composites can also be beneficial, guaranteeing easier installation while providing strength. Overall, select a tensiometer with materials designed to last, ensuring your irrigation system remains efficient over time.
Monitoring Depth Needs
Choosing the right monitoring depth for your tensiometer plays a significant role in measuring soil moisture effectively. For shallow-rooted plants, install your tensiometer at depths of 12 to 18 inches. Conversely, deep-rooted species need measurements at 24 to 36 inches or deeper. Soil texture also affects your choice; sandy soils generally require more frequent shallow readings, while clay soils benefit from deeper placement. To grasp moisture levels throughout the root zone, consider installing tensiometers at multiple depths. Regular calibration and maintenance are crucial for accurate readings, as they guarantee consistency, particularly when monitoring various soil layers. By understanding these factors, you’ll maximize the effectiveness of your irrigation efforts and support healthy plant growth.
Cost and Budget
Understanding the costs associated with a tensiometer can help you make a well-informed decision. Initial prices typically range from $50 to $500, depending on the brand and features. Maintenance costs can impact your budget, as some models may need replacement parts or more frequent calibration. Remember, an effective tensiometer can help reduce water usage, leading to potential savings on your utility bills. The size of your irrigation area also matters; larger fields may require multiple units, which can raise upfront expenses considerably. Finally, be mindful of integration costs with your existing irrigation systems, as upgrading to advanced models might necessitate additional retrofit components. Evaluating these factors will contribute to smarter budgeting for your irrigation needs.
Compatibility With Systems
Ensuring that your tensiometer works well with your existing irrigation system is essential for effective moisture management. First, check that it meets your system’s water pressure and flow requirements, typically ranging from 15 to 60 psi. It’s also important to take into account the soil type, as some tensiometers function better in sandy soils, while others excel in clay. Next, make sure the tensiometer can integrate with your control systems for seamless operation. Evaluate the installation environment; outdoor conditions can impact product performance. Finally, examine connector sizes and fittings to ensure compatibility with your existing lines, preventing leaks and malfunctions. Choosing the right tensiometer can profoundly affect your irrigation efficiency and crop health.
Frequently Asked Questions
How Often Should I Check My Tensiometer Readings?
You should check your tensiometer readings at least once a week during the growing season. By monitoring moisture levels consistently, you can guarantee ideal irrigation. If you’re managing sandy soils, increase checks to twice a week, as they drain faster. Adjust frequency based on weather conditions; after heavy rain, check readings more frequently. Calibration is essential too; inspect and recalibrate your tensiometer every season to guarantee accurate measurements for effective water management.
Can a Tensiometer Work With All Soil Types?
A tensiometer can generally work with all soil types, but its effectiveness varies. For sandy soils, which drain quickly, you might need to calibrate it more frequently; readings can change rapidly. In clay soils, it might take longer to respond due to compactness, often requiring a few days for accurate readings. Make sure to install it at a depth of 12 to 18 inches for ideal results, ensuring accurate moisture content measurements across different conditions.
Is a Battery-Powered Tensiometer Available on the Market?
Yes, you can find battery-powered tensiometers on the market. They offer convenience and portability, operating for approximately 50 to 100 hours per set of batteries. Most models range in measurement capabilities from 0 to 100 kPa, making them suitable for various irrigation needs. These devices typically feature an easy-to-read digital display, a durable waterproof housing, and remote monitoring capabilities, ensuring you’re informed about soil moisture levels without constant manual checks.
What Is the Average Lifespan of a Tensiometer?
The average lifespan of a tensiometer typically ranges from three to five years, depending on usage and maintenance. Regular calibration, proper storage, and careful handling can extend its life. Components like the pressure sensor, made of durable materials such as stainless steel, can wear out, requiring replacement. Additionally, environmental factors like humidity and temperature fluctuations may impact its performance. Always follow manufacturer guidelines to maximize durability and guarantee accurate readings throughout its lifespan.
How Do I Calibrate My Tensiometer Correctly?
To calibrate your tensiometer correctly, first fill the tensiometer tube with distilled water to avoid impurities. Next, connect it to a vacuum pump and create a pressure of about 60 kPa. Allow it to sit for 30 minutes, then check the readings. Adjust the scale if necessary, ensuring the pressure gauge aligns with your reference. Repeat the process until consistent results occur, aiming for accuracy within 2 kPa for ideal performance.